Table Of Contents
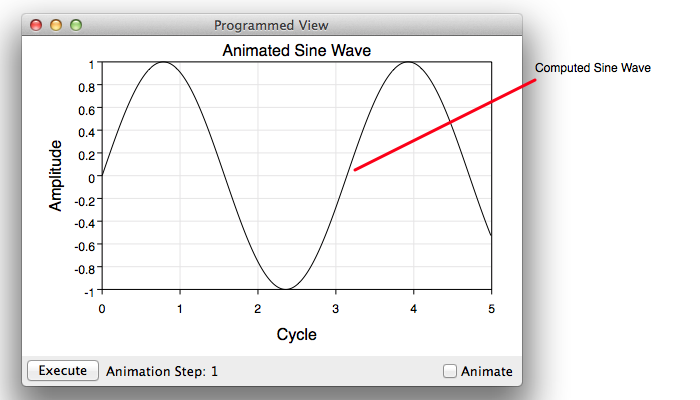
This section describes how to write a custom application called SineWave. The user interface is diagrammed below.
The fastest way to write a custom application is to download the SineWave example project, compile it and modify it for your needs. SineWave resources are available from these links:
| SineWave.zip | The compressed SineWave project located on your disk within this manual. |
| SineWave.zip | The compressed SineWave project located at the vvidget.org web site. |
| Xcode | The Xcode application on the Mac App Store. |
The following explains the essential steps of the SineWave project.
The graph and white portion in the figure above is a Graphic View that was pre-programmed using the Programming facilities of Graph IDE. The Execute button and Animate switch are programmed in the custom application. The steps are as follows.
The following code splice shows how to load a Graphic View into SineWave and how to execute and animate the graphic view program. This is a simple application and the loading is done in the Application Delegate. A more comprehensive custom application would probably do the loading in a document controller class.
|
@implementation AppDelegate


- (void)applicationDidFinishLaunching:(NSNotification *)aNotification

{

/* The graphic view is loaded from the document MyDocument.vvibook, which is a resource of the custom application, when the application finishes launching. */


    NSString *aPath;


    aPath = [[NSBundle mainBundle] pathForResource:@"MyDocument" ofType:@"vvibook"];


    theDocument = [[VVPUBLIC_GraphicDocument alloc] init];

    programmedView = [theDocument viewForDocumentPath:aPath];


    [programmedView setFrame:[_switchView frame]];

    [programmedView setAutoresizingMask:[_switchView autoresizingMask]];


    [[_switchView superview] replaceSubview:_switchView with:programmedView];


    [_window makeKeyAndOrderFront:nil];


}


- (void)applicationWillTerminate:(NSNotification *)aNotification

{

/* When the application is terminated then stop the document animation and release the document */


    [theDocument stopAnimation];

    [theDocument release];

}


- (IBAction)performAnimation:(id)sender

{

/* This is the action of the switch and turns animation on or off */


    if([sender state])

    {

        [theDocument startAnimation];

    }

    else

    {

        [theDocument stopAnimation];

    }

}


- (IBAction)performExecute:(id)sender

{

/* This is the action of the Execute button and performs one step of the animation. That step performs one acquisition of the data. */


    [theDocument performAnimationStep];

    [programmedView display];

}
|
The following is the program that the curve executes. It is applied to the Function in its Program inspector editor. It calls into the method called calculateCurve of an instance of the MyFunction class that you write (see the next code splice).
|
@@class() MyFunction:Object


@@method(public, class) (id)stored;

@@method(public, instance) (void)calculateCurve;


@@end


{

id myFunction;


myFunction = [MyFunction stored];


[myFunction calculateCurve];

}
|
The following is implementation the MyFunction class. The calculateCurve method computes the sine curve and assigns data points and attributes using the API in the Function programming section. Your implementation may do something more complex and reference a legacy codebase.
|
@implementation MyFunction


- (id)init

{


    if(self = [super init])

    {

        wavePeriod = 1.0;

        periodDelta = 1.0;

    }


    return self;

}


- (void)calculateCurve

{

    int ii;

    double xValue, yValue;

    unsigned animationCount;

    AppDelegate *appDelegate;

    NSTextField *infoTextField;


    animationCount = [self animationCount];


    appDelegate = [[NSApplication sharedApplication] delegate];

    infoTextField = [appDelegate infoTextField];


    [infoTextField setStringValue:[NSString stringWithFormat:@"Animation Step: %d", animationCount]];


    [self emptyData];


    if(wavePeriod > 20.0)

    {

        periodDelta = -1.0;

    }

    else if(wavePeriod < 2.0)

    {

        periodDelta = 1.0;

    }


    wavePeriod += periodDelta;


    for(ii = 0; ii < 500; ii++)

    {

        xValue = 0.01 * ii ;

        yValue = sin(xValue * wavePeriod);

        [self appendXValue:xValue yValue:yValue];

    }


}
|
When making the Xcode project follow the steps in the Plugin section, but with these important distinctions:
- When making a new project choose Cocoa Application.
- Make a new Add Copy Files Build Phase with Destination Frameworks and drag the Vvidget framework references from the project navigator to the Copy Files build phase list.
The SineWave.zip project is already setup with the proper references and build phases so that might be a good starting point.